Tuesday, December 27, 2011

Thank You


My friend, Julie, sent me this Thank You card.  She always makes lovely cards, but I was quite taken with this card.  I like the layout, the added touch of the pretty brad and of course the lovely cool colors.

Sunday, December 25, 2011

Merry Christmas To All


Els of Elizabeth Crafts designed this card using her shimmer sheetz and stickers.  It was my favorite when I took her class.  I normally will not make a card that requires a lot of intricate cutting, but I put on my patience hat to complete this card.  Most of her cards are quite easy to make and I highly recommend taking her class if you live in an area where she teaches.

My very best wishes to you all for a Merry Christmas and Happy New Year.

JR

Saturday, December 24, 2011

Peace and Joy


I like the texture in this card as well as the bling.  I think it works well for hannukah too.

JR

Friday, December 23, 2011

Merry Merry in Blues


I always like non-traditional colors for Christmas so I thought I would share some of the cards made with blue tones.  These are all pretty easy too.  If you have any questions about any of the cards I have posted just ask and I will give you more details.


Wednesday, December 21, 2011

Hero Arts Easy Cards


Do you remember when Hero Arts used to have card kits that teachers could use to teach classes?  I really liked those classes and was so sad when they stopped doing them.  I found these cards from several years ago and thought I would share them as they are all pretty easy to do and use the great stamps and easy techniques that we all appreciate from Hero Arts.


Hope that your holidays are merry and bright.

JR

Tuesday, December 20, 2011

Quick & Easy Christmas Cards


There is not much more time before Christmas so I thought I would post some quick and easy cards that I have made.   These cards were made in past years, but they are all easy to do and get in the mail quickly.  If I were making it today I would stamp the greeting in the one above with a much darker ink.


Hope you are enjoying the season.

JR

Glittery Goodness


Another Dreamweavers stencil - this time using my favorite glitter technique.  I may have described it before, but just in case here we go again.  You rub bar soap (Dreamweavers recommends a coconut soap that they sell and I concur) liberally over the back of the brass stencil, then take a large soft stencil brush and even out the soap bits (be sure to elimiate any large pieces of soap on the stencil or in the nooks and crannies of the design) then put the soap side down on the sticky side of some sticky paper or double sided tape that has been cut to the size of the stencil.  At this point you can just pour the green glitter over the top (or as I did here you can carefully put the yellow glitter over the star and tap off, then the brown glitter for the base and tap off and then the green over the rest and tap off).  Next carefully remove the tape (or sticky paper) from the stencil and dip the whole thing in white glitter.  Voila! You will have a wonderful glittery image which you can mount on your project.  As a side note the Happy Holidays was done with a stencil and green paste.

Give it a try it is so easy.

JR

Monday, December 19, 2011

Pointsettia Ornament

Deck the halls or your cards with gold embossed poinsettias.  I made this card a couple of years ago, but I still like it which is unusal for me.  Hope you are all ready for the holidays.

JR

Sunday, December 18, 2011

Do You Believe?


This card was made last year using a stamp put out by The Cat's Pajamas.  This stamp was my favorite last year.  Do check out Alma's website if you like whimsical stamps by clicking here.  She has lots of critter stamps and a great gallery with good project ideas.  I met Alma several years ago when I was first learning how to stamp and I took many classes from her.  She is a very creative lady and I learned so much from her.

The card above also uses some of the great silver shimmer sheetz and Elizabeth Craft glitter which I adhered with a Quickie glue pen and a bit of Denami paper that I found in my scraps stash.

Ho Ho Ho,
JR

Saturday, December 17, 2011

It's Hard To Be GOOD


This card was made at Scrapbooking Made Simple as a Make & Take last year.  If I recall correctly it was designed by Jennifer Priest who teaches at the shop.  I love all the layers and the fact that it really was easy with all the great papers that are out during the holidays. 

Hope you are all on Santa's nice list.

JR

Thursday, December 15, 2011

Dreamweavers Christmas Tree in Metal


I'm back...  I know it has been awhile since I posted, but real life has really been getting in the way of fun and holiday crafting.  My husband took some photos of cards that I have done in years past and a few new ones so I am going to try and post a few holiday cards over the next few days. 

This card was made using a new Dreamweavers stencil.  Different colors of metal were used, then sanded so the silver metal would show through, then cut into strips, glued to a piece of cardstock and finally cut into the tree shape.  This particular stencil made this quite easy as there were already horizontal lines to follow.

I really liked working with the metal and will have to do it more often. 

JR

Saturday, November 19, 2011

Heavenly Hound


This months swap with my local group is going to the dogs...  Well actually the theme is animals, but as you know I particularly love dogs so I had to go there.  I rarely color, but I got out my colored pencils and gave it my best shot.  I still struggle with markers, Copic or otherwise so I am sticking with my chalks and pencils.  I think the bling DCWV paper makes everything look good.

JR

Sunday, November 6, 2011

Butterflies Are Free


I was feeling the bling with this card.  It was made much like the Batty Halloween card.  I used a Dreamweavers stencil for the butterfly.  Rebekka recommends using some handmade coconut oil bar soap for this technique.  The soap is sold at Stampin From The Heart or anywhere that sells Dreamweavers products. 

  1. Rub the back of the stencil with the soap, make sure you really cover the stencil well otherwise you will ruin your stencil with this technique.  When the stencil is completely covered with soap take a large soft stencil brush and smooth out the soap and make sure that there are no pieces of soap stuck in the little openings of the stencil. 
  2. Now you put the soap side of the stencil down on a piece of sticky paper cut down to the size of the stencil.  Make sure it is really stuck down - avoid putting your fingers on the sticky tape or sticking the tape to something else. 
  3. For the butterfly I held the sticky paper and stencil upright and poured black glitter just in the center and let if fall like a waterfall.  Next I used purple glitter on both sides of the black, then red, then blue. 
  4. At this point remove the stencil from the sticky paper (the soap allows you to do this, otherwise it would permenately adhere to the sticky) and add the white or clear glitter.
You can use your soaped up brass stencil 3 or 4 times before soaping again so try this, experiment and see what you think.  It is not difficult.

JR

Friday, November 4, 2011

Just Swimming Along


We have been dreaming of a vacation and this card makes me remember our trips to Hawaii, which is not quite as nice as going there, but they are fond memories.  The wavy blue base was made with a Dreamweavers brass stencil, paper with a white core and bleach.  Put the stencil on top of the paper and spray lightly with bleach, carefully remove the stencil and put the paper aside to dry.  Once the paper is dry I pasted the turtle and the Aloha with gold paste.  After the gold paste dried I put the turtle stencil back on the paper and added some Palette pad glue and removed the stencil.  Then I gave it a quick burst from my heat gun and added the varigated gold leaf brushing off the excess with a large paint brush.  Now all I need is a Pina Colada.

JR

Wednesday, November 2, 2011

Friendly Cranes


Here is another card made with a Dreamweavers brass stencil.  The card was designed by Rebekka and made by me.  In this card a very smooth cardstock was sprayed with a mustard colored spray then the stencil itself was sprayed with two darker brown sprays and the stencil was used like a stamp.  The sprayed brass stencil was run through an embossing maching (I used my cuttlebug) which added some texture (the light part of the image is raised slightly).  Warning for those of us who love perfection:  you cannot control this and the color seems to  have a mind of its own and will migrate at will, but if you can accept the serendipity of it you may like the results.  After all it is just a bit of paper, ink and time.

JR

Monday, October 31, 2011

Gone Batty for Halloween


I love these bats!  Rebekka of Dreamweavers designed this card.  This is a Dreamweavers stencil that has been soaped up and put on double sticky paper.  I added black flock that had a bit of glitter added to it and patted down real well to get it to stick.  After brushing off the excess flock, I removed the brass stencil and added the white glitter.  The greeting is from Dreamweavers as well and was used with their orange paste.  Rebekka did a good job with this one.

JR

Sunday, October 30, 2011

Carved Jack O'Lanterns


Halloween is almost here.  I have a cauldron of goodies and am ready for the kids .  I love seeing all the costumes, especially the little kids.

This card was made with yet another Dreamweavers stencil, using black matte paste, then crackle paste, then coloring with pigment ink.  Each layer must be completely dry before going on to the next.  I used some crystal lacquer in the eyes and mouth after coloring a little with a copic marker to give it the glow.

JR

Saturday, October 29, 2011

Dreamweavers Dragonflys


Recently I found several panels that I had pasted using Dreamweavers stencils and paste but had never made cards with them.  So I spent an afternoon putting several cards together.  While making the card above I had in mind the birthday of a good friend who once told me that she saves all the cards that I send to her.  That was so nice to hear so now I try especially hard to send something that I think she will like.  I know she likes pastel colors and dragonflys so I hope this will please her.  This was made using silver paste and flicking some mica powder on the paste while it was still wet.  The jeweled ribbon is made by Making Memories, which I think I found on sale at Michaels.

JR

Thursday, October 27, 2011

Creepy Crawlies


Dreamweavers stencil came through again with the spiker web and spider.  Silver pasted for the web and black mat paste for the spider and Rebekka came up with a cute card.

JR

Wednesday, October 26, 2011

Let's Booooogie!


OK so this is not my best pasting effort, but I am sharing it because I love the Dreamweavers stencil so much.  Wouldn't this make a great invitation?  The stencil was pasted with white paste and then after it dried I added alcohol ink with a sponge for the color.  Now here is where I got into some trouble because I added some blending solution to the alcohol ink and when over it several times to get the colors, which made the paste run a bit and I ended up with a mess so careful with liquid.

JR

Tuesday, October 25, 2011

Autumn is in the Air


I made this card to send to a friend with an October birthday.  We both love dogs and I saw this stamp at Stampin From The Heart and I had to have it.  You can see Karen's blog (from Stamping From The Heart) by clicking here.  I stamped and embossed the image and used Radiant Pearls to color and emboss.  Unfortunately Radiant Pearls are no longer sold, but I love mine and will be very sad when they are all gone.  I rarely think of using ribbon, but recently I have been organizing my craft room and I have so much ribbon that I am making a concerted effort to use it.

JR

Monday, October 24, 2011

Black and White Mirror Image


October's swap with my local group was for a black and white card that had a mirror image and this is the card I made.  I used the Pagoda cartridge with my Cricut Expression for this image.  I ran the image through an embossing folder then smeared Versamark over the top and added clear embossing posder to make is a bit shiny.  Of course I added glitter and jewels.  I used a chunky glitter to give it more texture and colored a clear jewel with my Copic marker to make it black.

JR

Sunday, October 23, 2011

Trick or Treat


This card was made for an online pet swap.  However if we used a Halloween theme we were promised extra cosmic bonus points and I figured I need all the points I can get.  I am so very much a dog person, but I just love the Fluffles stamps that Stampendous makes.  This one is one of my favorites.  You can see that this is the card where I borrowed Kristie's idea of adding a piece of candy to the card.  Thank you Kristie.

JR

Friday, October 21, 2011

More Bewitching in South Africa


So today is the rest of the cards from the South African ladies.  The card above wad done by Sandra with some great stamps that I have not seen before.


Sheilah made this card and has done an excellent job of capturing the Halloween theme.


Isn't this a pretty card by Sheree?  Bewitching in pink!


Sue made this lovely floral card with lots of texture.  Isn't that shiny flower in the center great.


Sandy G also went with an African theme.  I love it!


This card by Gloria is not only Halloween colors and images, but I love the fact that she turned the card around to make it portrait.  She is the only one who did so and I am sure that says something great about Gloria.

Not all of the South African ladies have access to the internet, but I hope that some of them will see their work displayed.  I am sure they would love to see your comments.

JR

Thursday, October 20, 2011

Bewitched in South Africa


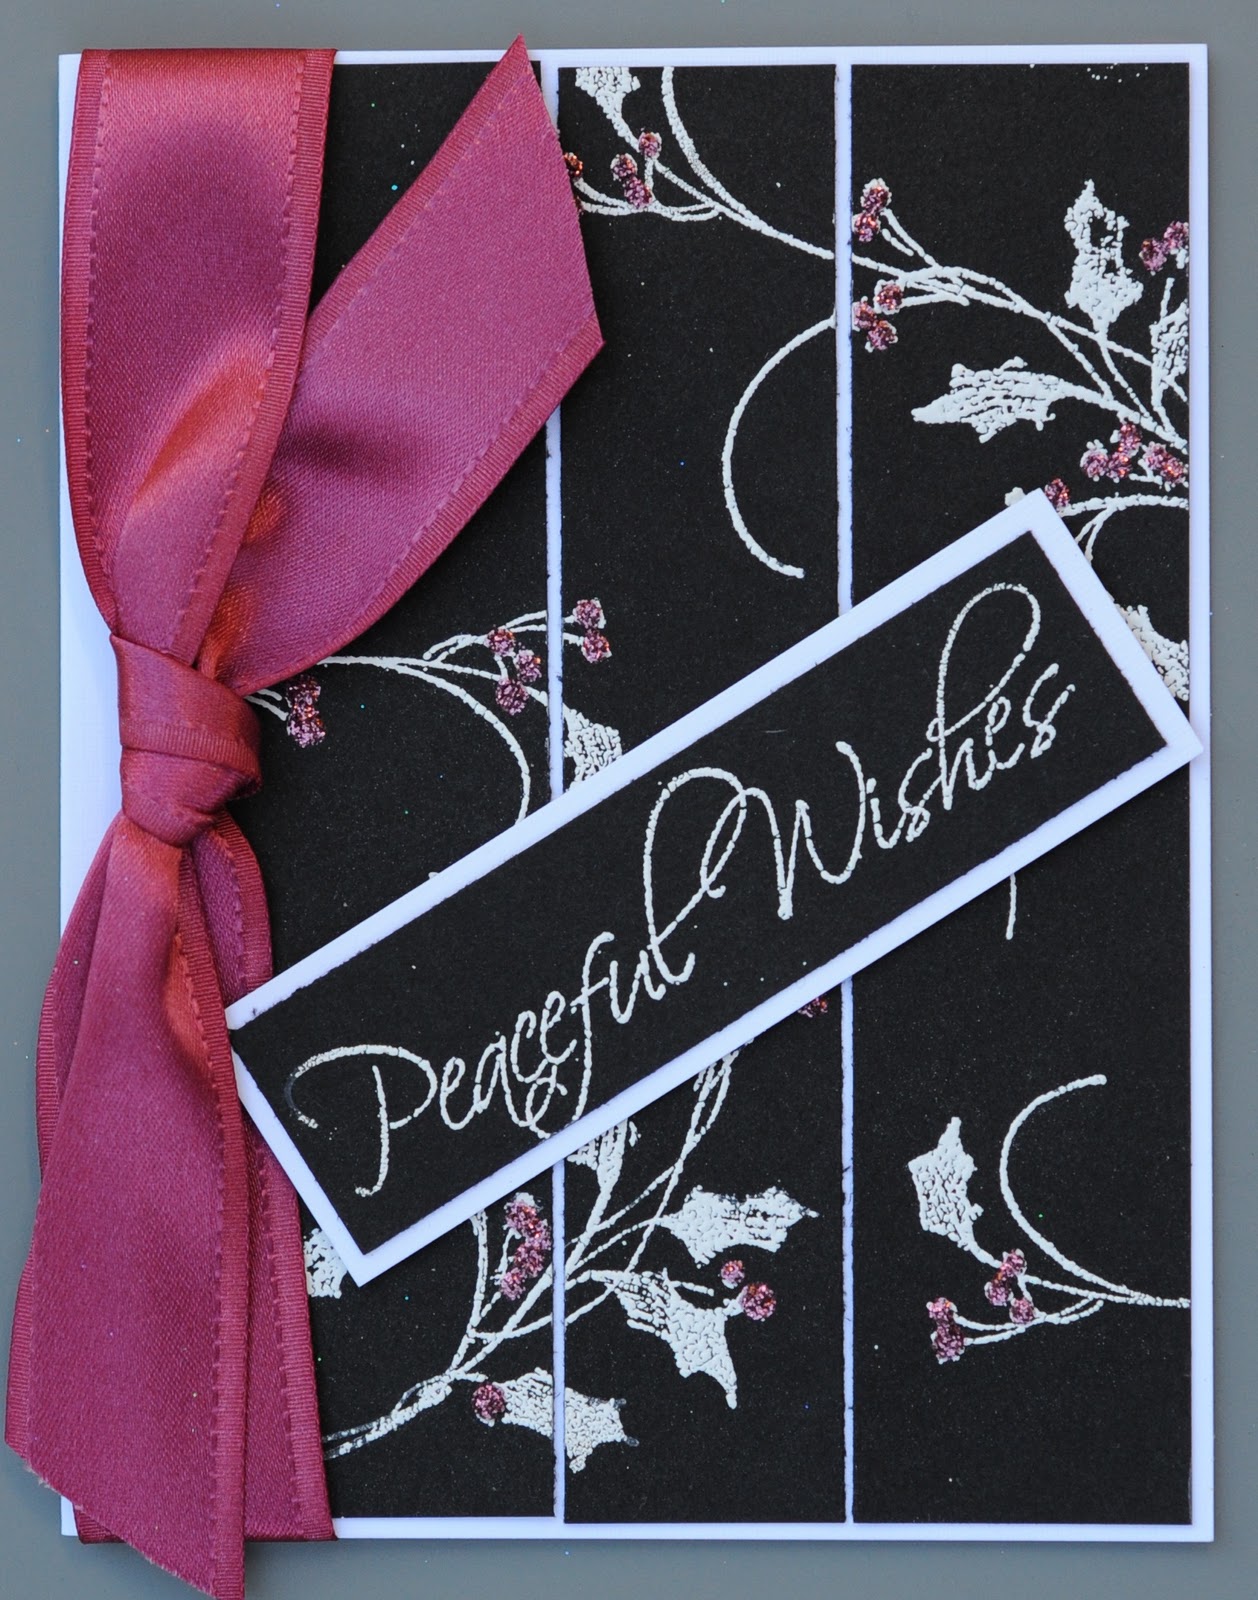
As promised here are the Bewitching sketch cards that were made by the South African ladies.  They tell me that Halloween is not a popular holiday in South Africa so they do not have access to many Halloween themed stamps, but I love their take on the Bewitched theme.  The card above was made by Carol-Anne.  I am not sure how she made those panels, but I think they look great.


The bewitching pink lady was made by Edna.  I love her flower.

Jenny made the card above.  I am bewitched by those eyes.


Lyn made this card with her bewitching fairy.  I love all the shining texture on this card.


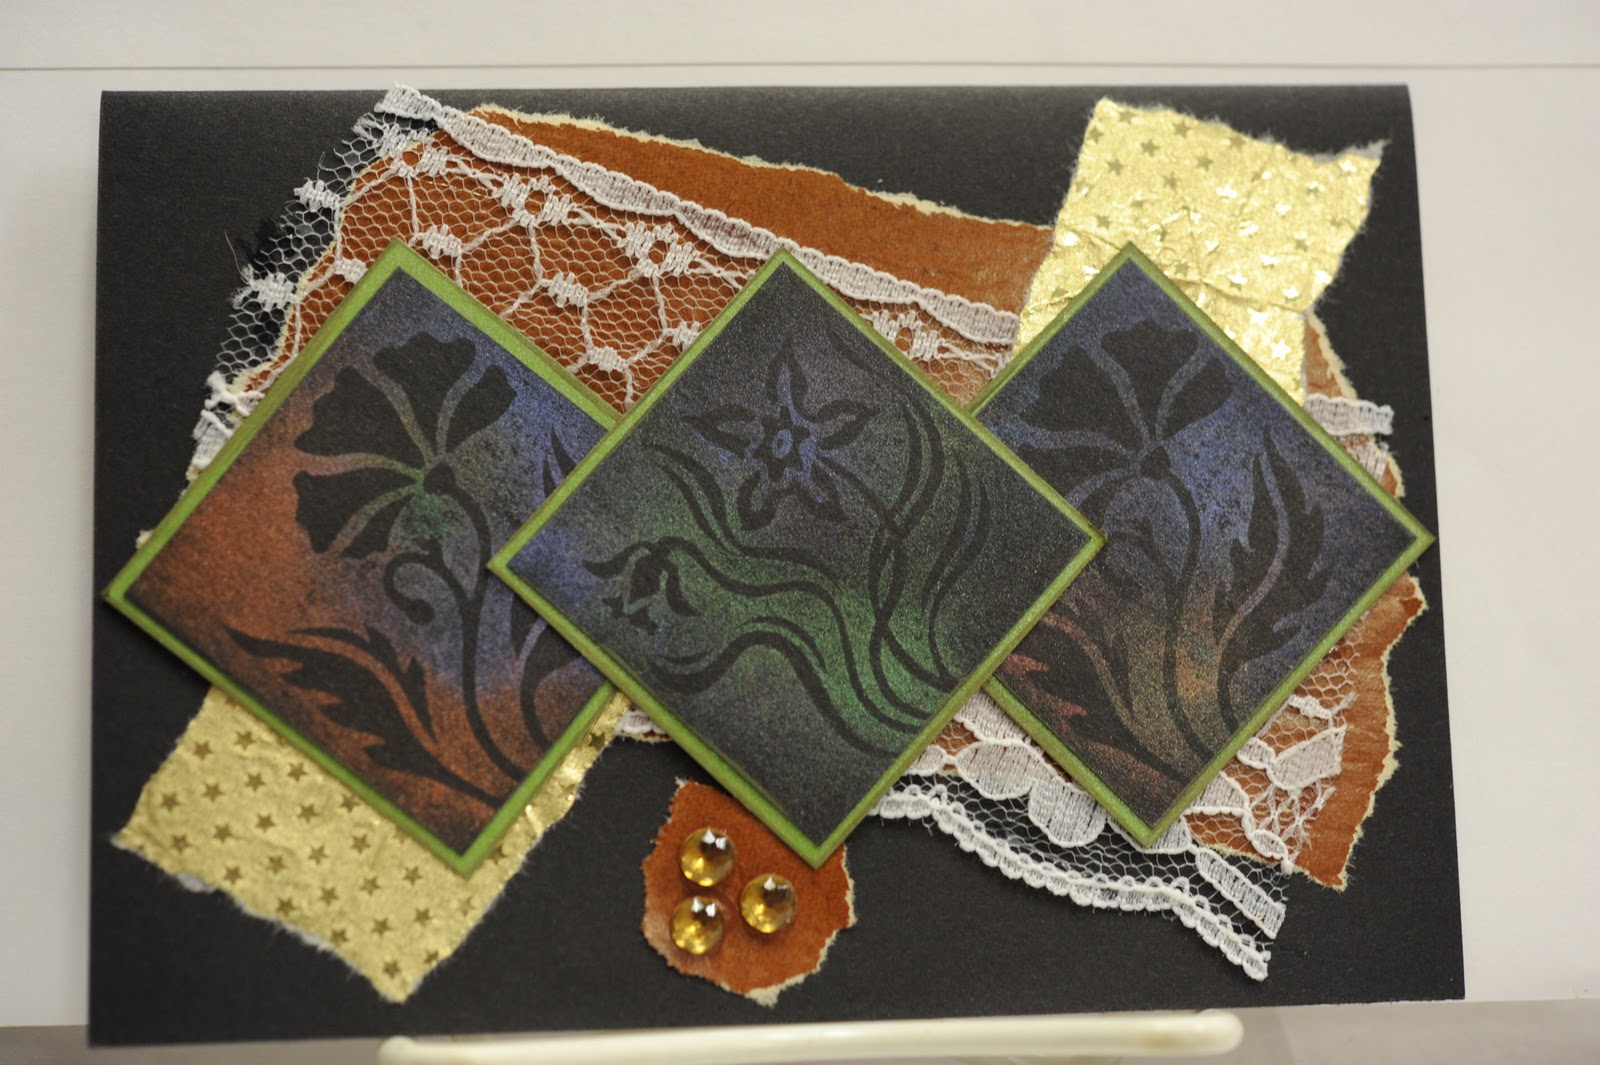
Maire went Asian with her card.  Isn't it great?


This card was made by Marj who just recently lost her battle with cancer.  She will be missed.  I think she did a great job with this card even without using traditional Halloween images she has captured the spirit.


This card was made by Nicky.  Great texture and definitely makes me think Halloween. 

There are more cards from South Africa.  They have a bigger group so watch for next batch.

JR